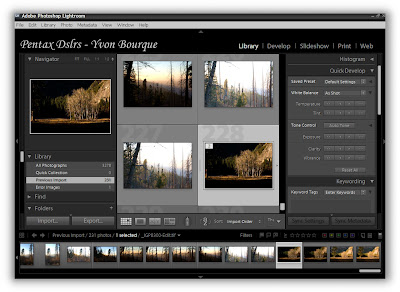
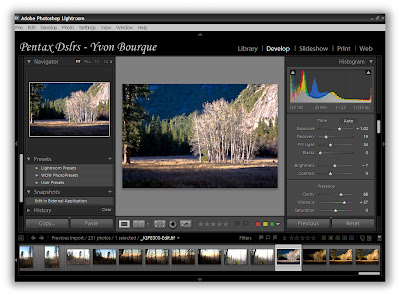
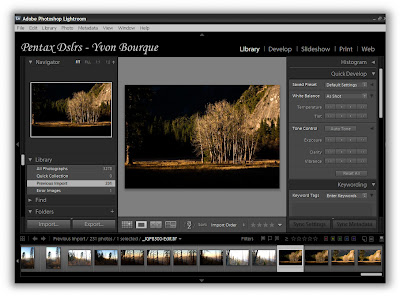
Wednesday, December 26, 2007

Pentax DSLR Photographers...Photoshop CS3, Lightroom or Elements?

2nd edition, 12/27/07 @ 9:18 P.M.

I use a Pentax K10D for almost all of my photographic endeavors. Most all DSLR makers make a camera that fits your needs and budget. It would be nice to have one of each.
Figure 1 of 7
The above Figure shows the Library screen of Photoshop Lightroom. At the bottom, all my pictures in that folder are shown as small thumbnails. To the upper left, this is the picture I am choosing. In the middle, are larger thumbnails of my chosen image and the images surrounding it. I coud have shown the chosen image full size.

Figure 2 of 7
Here is the chosen image in full size in the middle screen.

Figure 3 of 7
Now we are changing mode from library to the develop mode. This is where I can change the white balance, the histogram, saturation, luminance, even correcting the lens chromatic aberration or vignetting. You can't do that in Elements.

One of the best imaging software is, (in this photographer’s opinion anyway) Adobe Photoshop CS3. However, Photoshop Lightroom is becoming one of the most versatile software used by Digital Photographers. Photoshop Elements, now released in version 6.0, is also a good alternative for entry-level to advanced hobbyists. It seems that photographers using all brands of cameras, from Nikon to Canon, Pentax to Olympus, Sony and all the other brands, all have one thing in common…Adobe Photoshop family of software. There is no question that if money is no problem, or if you make your living from photography, Photoshop CS3 or CS3 Extended is likely your overall best choice. That is not to say that Professional photographers are better at the craft. It is to say that since Professional photographers make their living from taking pictures, they need the best tools on the market. They need the current leader in image manipulation as well as a reliable indexing system, capable of handling thousands of files. Their business depends on it, and it is a competitive market.

Aren’t there more hobbyist photographers in the world than there are Professional Photographers? I believe so. Are the final results of using the top-of-the-line software that much better than using affordable software such as Lightroom and Elements? Well, I don’t think so. Pros don’t have as much time on their hands as hobbyists have. They need to get the best pictures out as quickly as possible. For Pros, time is money. For hobbyists, time is just...well... more fun time doing what you like. I believe that equivalent results can be achieved with more economical software, but it takes more or your time to get there. If you’re a hobbyist, you like spending as much time as possible doing what you like anyway...such as photography, don't you?. But wait a minute you say…spending hours in front of a computer screen, working on images isn’t exactly photography, or is it? I’m afraid that if you have chosen Digital Photography over Film based Photography; computers are part of the equation. You can print your digital photos directly from the camera, but if you want to do that, get a point-and-shoot. This would also be the equivalent of yesteryear’s hobbyists bringing a roll of 35mm film to the corner drug store for developing and printing. The final results were left to the eighteen years old employee running the Kodak developing machine. More often than not, the machine was not cleaned as per the vendor’s specifications. You never knew what your pictures were going to look like. Of course you could have built your own darkroom, play with chemicals, learn the sophisticated craft, stay in the darkroom for hours, and spend tons of money. Fun! Nowadays, a few hours spent in front of a computer screen seems tame compared to that, and what’s more, you have full control of your pictures from the moment after you press the shutter release to the final print or image.

Yes, there is a plethora of dedicated software packages available out there, but I would like to concentrate on Adobe Software only, as they are by far the most popular, aren’t they? Adobe Lightroom and Elements are my choices for entry-level to advance amateur photographers. If you shoot JPEG only, Elements does a real good job, and the new version 6.0 approaches the usability of CS3 in many ways. If you don’t shoot RAW yet, you should because Lightroom has changed everything. Lightroom helps you make the transition from being a “JPEG only shooter” to a “RAW most of the times shooter” as easy as possible. Yes, you can shoot in JPEG for conserving space or for the internet, but RAW is really the wave of the very near future. Soon, JPEG will be a format of the past or for the internet only. Just wait and see. Computers are getting faster all the time and memory is cheaper than ever. That trend will continue.Lightroom was designed with input from photographers from all over the world. That was a smart move from Adobe. It’s really oriented toward photographers as the workflow structure is similar to what most photographers would intuitively do.

None-the-less, Lightroom is still a great tool even if you have CS3. They compliment each other. It is easier to use than CS3 and is also great for manipulating RAW images. Final touch can be achieved with CS3. The ideal combination for Professional Photographers is indeed Lightroom and CS3.


Figure 4 of 7
After I am satisfied with the modifications, I transfer the RAW file to Photoshop Elements directly from the Lightroom screen. It will be exported to Elements as a JPEG file. I could have chosen TIFF or other types of file as well.


Figure 5 of 7
You see how the new Elements 6.0 looks like Lightroom. They compliment each other. Here, I can resize my file, use tools such as dodging and burning, until I get what I want for this particular instance.


Figure 6 of 7
I decided to darken part of the photo and to concentrate on the sun rays hitting the trees and mountain behind. I used dodging and burning to achieve that by applying it to some portion of the photo only. You can't do that in Lightroom. That's why they complement each other.


Figure 7 of 7 I finished by inserting a frame around my image and added my name to the final photo. After that I printed the image as seen above.

The ideal combination for non-professional photographers, on a budget, is to use Lightroom in conjunction with Elements version 6.0. I like version 6.0 because the screen looks a lot like Lightroom whereas the background is dark grey and black and seems to compliment Lightroom. There are also some important improvements from version 5.0. Lightroom will manipulate all file formats, from RAW, PSD, TIFF, DNG and JPEG, with more correction latitude than Elements. What I find nice is that you can shoot RAW and manipulate the white balance, colors, saturation, etc, in Lightroom, then convert the final image to JPEG and send it to Elements, right from the Lightroom screen. Why do that? For one thing, you can now shoot RAW with ease. Then, by sending the file in JPEG to Elements, you keep the original RAW files intact in Lightroom and the JPEG files on Elements. Once sized properly, JPEG files will print just as good and faster on Elements. You can index all JPEG files in Elements for printing or e-mailing, etc. The files are smaller. And when you want to print a very big image, you can go back to Lightroom where the original intact RAW file is located and manipulate the image from the original. You can index all the RAW files in Lightroom and the JPEG files in Elements.

Note: I read somewhere an analogy of RAW and JPEG files compared to a RAW and cooked steak. You can take the RAW steak and broil it or BBQ it, or bake it, etc. If the steak was a JPEG (Already cooked) , say broiled, you could never change it to a BBQ steak and keep it acceptable. Once cooked, you can't go back to the RAW steak and start over. You are stuck with the cooking method you chose to begin with.

Lightroom is expensive you say? Let me tell you how you can still get Lightroom for less than $100.00. Certainly, you must have a spouse, or a child, or a brother or a sister, or a nephew or a niece that is still going to school or college or teaching at a K12 or higher school. Get them to buy the software for you. There are Hughes discounts for students and teachers. Here is one place, Discount Place . There are many other similar discount sites.This is not really cheating, as a real student or teacher is purchasing the software. Since they happen to live with you, you can just use their computer to do your photographic work. They are sharing their computer with you. You know what I mean.

Please leave your comments or opinions here or in the forum. In addition, it would be nice to know what of the categories below you fit in.

Are you an entry-level photographer, a hobbyist or a Professional Photographer? What platform are you using, PC or MAC? What software are you using, and why? What brand of DSLR are you using?

You can also email me. info@k10dbook.com

Thank you for reading,

Yvon Bourque

Tuesday, December 18, 2007

One way to get the right exposure…Bracketing

Exposure Bracket Mode

One undeniable way to get properly exposed pictures is to bracket the exposure. Bracketing is described as taking several shots of the same subject with variable ex­posure settings ranging from underexposed to overexposed frames. The term “frames” comes from the film camera era and can be replaced with the word “files” in the digital world we now live in. You can take three or more shots of the same subject, within just a little over a one second period and with a different exposure setting for each shot. This increases the probability of getting a properly exposed picture significantly.

In all likelihood, the K10D is capable of taking a correctly exposed shot the first time with Autofocus lenses, as both the camera and the Autofocus lens used, ex­change data during the exposure. But what about the older manual lenses? The K mount manual lenses as well as the M42 screw mount lenses will all work with the K10D to some degree. Of course, the focus will be done manually, although the camera does confirm focus in the viewfinder and with an audible beep. The tedious task becomes setting the proper exposure when using a manual lens. I can’t think of a better way to achieve perfect results with less than 100% compatible lenses, than using the exposure bracketing method. Pentax has approximately twenty five mil­lion lenses out there in the world, which can be mounted on the K10D directly or with the use of an inexpensive adapter. For instance look on EBay; they usually have hundreds of manual lenses that can be purchased on any budget. What a great way to increase your lens collection and satisfy your LBA. Most of these older lenses have something in common that is rarely seen in today’s modern lenses. They were mostly all assem­bled by hand and were typically made out of metal. The maximum apertures were also larger than the lenses sold today. It is said that if today’s lenses were made with the same quality standards and fast apertures as the older lenses, they would cost thousands. So, whether you have been wondering about the usefulness of older lenses or not, they can all be used. Excellent results can be achieved thanks to the Auto Bracketing mode built in the K10D. 
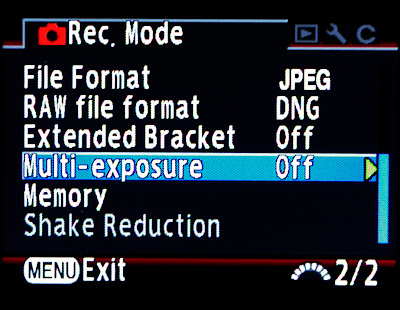
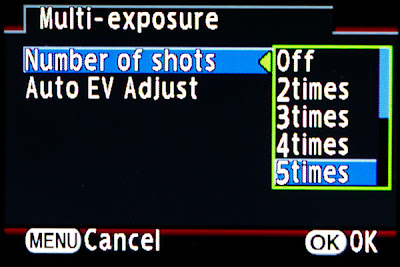
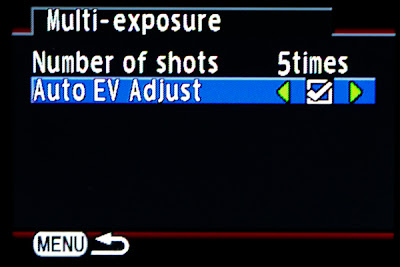
The bonus is that, unlike film, once you have a good memory card, there are no additional costs to take multiple exposures, and you can see the results immediately. You can delete the unwanted shots. Digital is good. To set the Auto Exposure Bracket on the K10D, press the Exposure Bracket button (Located to the left of the viewfinder…no menus to surf through. This is a dedicated button.) and while holding it pressed, use the front e-dial to set the auto bracketing to either on or off and with 3 shots or 5 shots. You can also set the amount of brack­eting you want to use between each shot in increments of 1/2EV or 1/3EV. Just in case you don’t recall, here is how to set the EV steps. Press the Menu button. Using the four-way controller, navigate right to the Custom Setting Menu, then down to EV Steps. Move to the right and choose 1/2EV or 1/3EV steps. Press the OK but­ton twice. What’s more, you can select the order in which the bracketing works. It can be set so that the first shot is underexposed, the middle shot is exposed per the camera metering system, and the last shot overex­posed. Any com­bination can be set. To change the bracketing order, press the Menu button. Using the four-way controller, navigate right to the Custom Setting menu. Using the front e-dial, go to page 2/6. Navigate down to Auto Bracketing order, then right and then to your preferred sequencing. 0 means no compensation, + means overexposure and – underexposure. Press the OK button twice.


The example above shows an auto bracketed image with five shots taken in incremental steps of 1/3EV and organized with the most overexposed image first, toward the most underexposed last. The series was taken in JEPG format with five separate exposures. The shutter release button was fully depressed and stopped automatically after the five shots were taken. It took just over 1 ½ sec to shoot the entire set. The same sequence could have been shot in RAW format and post-processed with greater correction latitude.

Now…just think of how this would be useful in HDR (High Dynamic Range) photography!

We will talk about HDR photography in an upcoming post.

Thank you for reading,

Yvon Bourque

Sunday, December 16, 2007

Using multiple exposures on the K10D instead of neutral density filters


Both pictures were taken with multi-exposures. I recall 5 multi-exposures for the top picture and nine for the one above. The greater number of exposures, the blurrier the moving portion of your picture are, in this case...the water.

I read all kind of questions on various forums and blogs about using neutral density filters. The use of neutral density filters can diminish the light reaching the sensor, and in turn, allowing a slower shutter speed during bright daylight. I assume that you know why this is useful, but here is a brief scenario. It’s mid-afternoon with the sun directly above the scene. The scene is of a water fall or of water rushing in a river. You want to capture the water with a slow shutter speed so that it will have that soft velvety look to it. In order to do that, you need a slow shutter speed of around 1 second to 1/30th of a second, depending of the speed at which the water is flowing. At such a slow shutter speed, even with smallest aperture, it often is still too bright to capture the photograph. What do you do? Well the common answer is to use one or more
neutral density filters. A polarizing filter also helps. That creates another problem. You have several lenses with different filter sizes. Your current lens has a 77mm filter size and you just don’t have the money to spend on several 77mm neutral density filters that may only be used once-in-a-while.

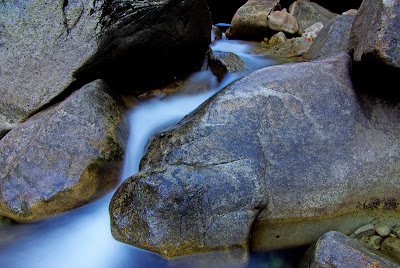
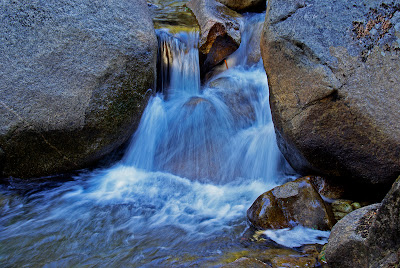
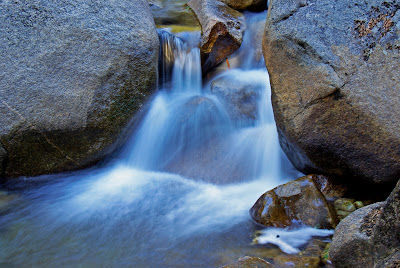
Again, the top picture was taken with 5 multi-exposures and the one above with 9.

If you are lucky, you have a Pentax K10D with multiple exposures (up to nine exposures to be exact). You don’t need any neutral density filters to take the same type of photographs. You don’t even need to shoot at slow speed. You can use whatever aperture you like. You will however still need to use a tripod, just as you would have with a 1/10th of a second or longer shot. How’s that possible?

Well it’s simple. You set your K10D for multiple exposure (I use at least five exposures) and also allow the camera to automatically adjust the
EV. It’s best to use a remote control, wired or wireless, they both work fine). That’s because you don’t want the camera to move from one take to another. You press the shutter release once, and then a second time, and so on until you have taken the five shots or the number of shots you have chosen. Everything in the image that was not moving is crystal clear. Everything that was moving multiple images of it impregnated on the overall shot. The flowing water now has that smooth velvety appearance, all without using neutral density filters.

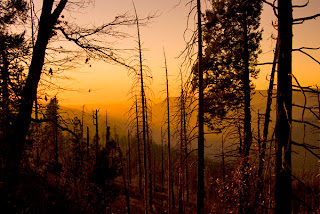
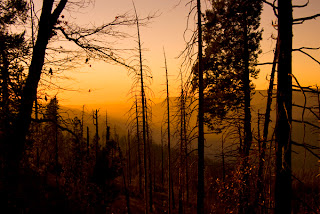
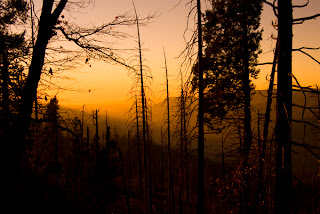
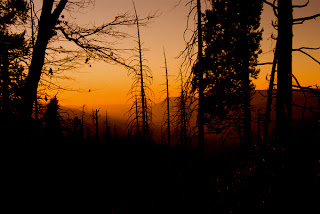
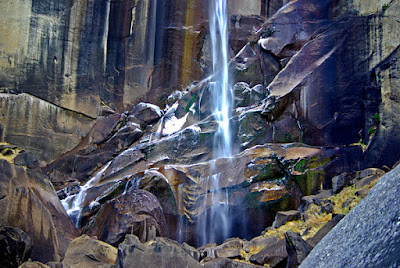
This picture captured in Yosemite National Park shows the velvety effect. It was shot with the Pentax K10D using the multi-exposure method. I believe I used 9 exposures here.
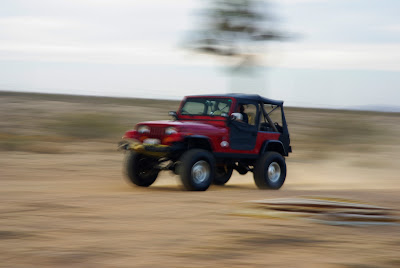


Do not confuse the multi-exposure method with the panning method. Multi-exposure will not work as it takes too much time between each exposure.

Here’s how to set your camera. Press the menu button. Go to page 2/2 of the Rec. Mode menu. Using the four-way controller, move the cursor down to multi-exposure and then right. Now move the cursor down to the number of exposures you want. Press the
OK button. Next, go down to Auto EV adjust and move the cursor right until it is checked. Press the OK button twice and you are ready to go.


P.S. Recently, other photographers have discovered that better results (less noise) were achieved in taking pictures at night or dark scene by taking multiple exposures of the same scene rather than using higher ISO. The results are debatable, however, try it for yourself and you be the judge.

This is the basis of the multiple-exposure mode:

Multi-Exposure Mode

The Multi-Exposure Mode is the old double exposure or multiple exposures tech­nique used in the film cameras era, when there was no Photoshop® with layers to work with. Essentially, it is a creative tool allowing stacking up to nine images on the same frame or file. Using a tripod for instance, you can have a person move up to nine times within the viewable area of your image and at the end; it will look like the same person is at 9 different positions within the picture, although they would appear like ghosts. With double exposures, a person could mimic having a twin with him or her in the picture, etc. In the old days, you had to calculate the exposure for the total number of exposures, and for the most part, it never worked properly. Kids will love the effects of them being in the same picture several times. You can put a moon in the night sky, enlarged by a zoom lens if you want, over a City or landscape or whatever, giving the impression of a large rising moon.


This picture of my daughter was achieved with two exposures. One of her with a prime lens and the other with a telephoto, while I remembered where to put the moon.

It’s a creative tool and as a creative tool, it’s only limited by your imagination. It’s nice to know that you have that option already imbedded in the electronics of the camera. While taking the multiple exposures, each frame will be displayed temporarily on the LCD monitor showing the combined results. If you don’t like one of the frames, press the Erase button and that frame will be discarded. Once the pre-selected number of frames is reached, it will be saved as one picture. Try it, it’s a lot of fun and you may be surprised by some of the results, all without using post-processing.

Thank you for reading,


Yvon Bourque

Monday, December 10, 2007

My fierce killer friend...and she was supposed to be praying.

Macro and close up photography can be rewarding. You can see details that you would normally not perceive in everyday life. Here is a series of close up photographs of a brave Praying Mantis.
Imagine if it was six foot tall!

Praying Mantis, (also often called preying Mantis because of the carnivorous way they eat their prey) are abundant in Southern California. They reason they are called Praying Mantis is apparently because of their “prayer-like” stance. The one pictured here wasn't praying and I'm sure she would have like to eat me. Don't they look like space aliens?
Her mouth was too small to bite my finger.
They eat their victims while they are still alive and start by eating the neck first so that they can’t move. Given their sizes or at least the size of this one, they can’t bite humans for their mouths are too small; lucky us. Lucky us for another reason as well. After mating, the female often eats her mate. That’s a real high high price for having sex, don’t you think?
I think she's smiling, or is she flirting with me?

The Praying Mantis pictured in this post was taken with my Pentax K10D. Most pictures were taken with the 18-55mm kit lens, some with a close-up filter. The females are green and the males are brown. Obviously, this was a female. She wasn’t scared of me at all. I could hear her hissing and she made herself look bigger by spreading her wings and taking an attack position. She was rocking back and forth, I guess with the hope of scaring me, but to no avail. I have since caught many more of them but none ever expanded their wings like this brave little soul pictured herein.
Hey big boy...you come and see me sometimes.

We have to give her an "A +" for bravery. I also read that the females often expand their wings to attract males for you-know-what (doing whoopy". Maybe she found me attractive, or saw a big meal in me, but, lucky me…I'm human.

Am I scaring you yet?

Don't you play with my antennas.

Thank you for reading,

P.S. For more Preying Mantis blog post, see the Sex life of a Preying Mantis here.

Yvon Bourque

Saturday, December 1, 2007

My own personal reasons why I purchased the Pentax K10D

Dear Pentaxians,

There were many Digital SLR choices out there, many with great features, some priced right, some too expensive for me, other with new cutting edge technology, and so on. I am not a professional photographer, given that I do not make a living from my photography. I have been an avid photographer since the age of twelve. I had some of my photographs published, I sold my photos at art fair, I pursued wedding and children photography for a while, and recently, wrote books on the Pentax K10D and K100D. So I do bring some revenues in from photography but I still have a day job and consider myself an amateur photographer. However, technically speaking, I don’t think that the Pros are necessarily better photographers. Actually, I sometimes feel a little sorry for them as they must keep up with technology and always have the latest equipment at hand. It would be awful for a Professional Photographer to do a wedding where “uncle Bob” had better “Pro” equipment than the official photographer. This entire introduction is to say that the camera reviews done by Professionals has not swayed my opinion one bit.


Marketing, ranks amongst the DSLR makers, magazines reviews (which have to say something nice about every DSLR makers if they are to get their business) and finally other photographers' opinions, have not influenced my decision. I made the decision of buying the K10D all by myself.

I started my photography with Pentax and I have to admit that I always had a sweet spot for Pentax. That said, I probably owned a camera at one time or another, from most manufacturers. I used 35mm, medium format, and large format cameras and now of course, Digital SLR. Photography is relatively a simple concept. It’s all about lighting. You have a media (film or sensor) encased in a box, and a glass lens (nor necessarily, as a pin hole will project light as well) which projects the light on the media. Although over simplified, to get the right amount of light on the media, the tools are the aperture, the shutter speed and the media sensitivity. Everything else is luxury. We are all so very lucky to live in an era of such technological advancement and yet, we often fail to realize it.

Back to the K10D…I realized early that digital was going to leave film media in the dust, I started searching. I purchased several point-and-shoot cameras to begin with, in the 1 to 2 megapixels range. Then I graduated to higher Megapixels, around the 5 Megapixels, but none were good enough to replace my Nikon F5 (Yes, my last 35mm camera was a Nikon F5.) Nikon had by then started the DSLR revolution with the Nikon D1. It was impressive, but at $5,000 for 2 Megapixels, I couldn’t afford it, remember, I am not a Professional Photographer and I do not have to impress anyone. It seems that for a while, newer and better cameras were introduced to the market every month. My best pictures were still produced with 35mm transparencies, scanned to digital.

Some years passed and Pentax introduced their first DSLR, the Pentax *ist D. I joined the DSLR bandwagon with the Pentax *ist DS. I still have it. It was okay but it didn’t make a great impression, other than being the smallest DSLR on the market at the time. I have to admit that I was a little disappointed. I wanted Pentax to be amongst the leaders once again. They always had a reputation of being innovators. In 1954, they introduced the first instant return mirror system. In 1957 they introduced a prism for the single lens reflex. In 1964, they introduced the Spotmatic featuring the first TTL metering. Other innovations followed; the multi coating of lenses, the first TTL auto focus camera, the first multi-mode medium format camera, the Pentax 645. Who hasn’t heard of the Pentax K1000? It was the ultimate SLR when comparing simplicity and price.

That is the prime reason I always liked Pentax…Simplicity and affordability.

Finally, in 2006, with the introduction of the K10D, I believe Pentax started heading in the right direction once more with simplicity and affordability. What other cameras in this price range have a dedicated button for RAW? A dedicated button for exposure bracketing? An in-camera Shake Reduction system? A dust reduction system for the sensor? A moisture and dust resistant body? A choice of RAW format between PEF and DNG (Adobe attempt for a universal RAW format)? As you know, this is just scratching the surface. The K10D is chucked full with innovations accessible in a simple way.

The K10D is so well design that I rarely have to surf through pages of menus to change functions. So, the bottom line, the reason I chose the K10D is Simplicity of use and Affordability. Entry-level photographers can grow into this system. I believe that this is just the new beginning. Watch for the upcoming K20D and the K200D. They will eclipse the competition for simplicity of use and price. You just wait and see.

Thank you for reading,

Yvon Bourque