Showing posts with label Sony. Show all posts

Thursday, December 6, 2012

CES 2013 is around the corner, January 8th through 11th. I will be attending for the duration and will report mostly about the Digital Photography portion of the trade show.

Email: brqyvn@gmail.com

 Hi Photographer friends,


This year's, the old "PMA" (Photo Marketing Association)  Photography  trade show is again part of the 2013 International CES, where the world manufacturers of Consumer Electronic show their products.

The PMA show and convention vanished after 2010, the year they decided to hold the trade show in Anaheim, California, instead of Las Vegas. After that fiasco, many of the top brands didn't participate in the annual even renamed CliQ.  Canon did not show up after that show, even though is was brought back to Las Vegas. Nikon had a smaller presentation, Pentax only had a private room to meet with guests. The PMA joined the CES trade show in 2012. It was  successful, but I did not have a chance to attend the 2012 CES.

This year is different and I got my registration in place back in August. I am qualified as "Press" and as such, I will be privy to more access than regular visitors.  I will use that opportunity to bring all the news regarding Pentax and all other brands to this blog. I will try to get some interview with representatives and post that on this blog. 

The difference with my reports and those of reviewers, will be that I don't necessarily look at the high technology of things. I look at the usability and the user's friendliness of photographic equipment. 

If you are attending, it would me my pleasure to meet and say Hi to fellow photographers. An email prior to the show would work. 

The trade show is from January 8 through January 11th, 2013. It's really just around the corner.

If you have specific questions you would like to ask to any of the camera manufacturer, let me know in advance and I will be sure to ask and report results on this blog,  

Thank you for reading,

Yvon Bourque


Attendees visit exhibitors in the PMA @ CES TechZone at the 2012 International CES. (c)  CES
These are certainly booths that I will spend a lot of time at:

PENTAX RICOH IMAGING AMERICAS CORPORATION

Booths:
LVCC, Central Hall - 15113
LVCC, North Hall Mtg Rms - N201
LVH Hospitality, - Suite 1710

Canon USA Inc.

Booths:
LVCC, Central Hall - 13304
LVCC, North Hall Mtg Rms - N109 

Nikon Inc.

Booths:
LVCC, Central Hall - 8643
LVCC, Central Hall Mtg Rms - C201C202 

Olympus Imaging America Inc.

Booths:
LVCC, North Hall Mtg Rms - N232N234N236N238N240 

Sony Electronics Inc.

Booths:
LVCC, Central Hall - 14200142131523015231
LVCC, North Hall - 1409 

Sigma Corp of America

Booth:
LVCC, Central Hall - 7904


P.S. Do you have the Pentax K-30 or the Pentax K-5 / K-5 II / K-5 IIs?  You should consider getting a dedicated e-book about your favorite Pentax Digital Camera here.


Saturday, January 14, 2012

"One camera one Lens" It might be more applicable now than ever before..

Email: brqyvn@gmail.com
The "One Camera, One Lens" applies for all makes, Pentax, Canon, Nikon, you name it. I own Pentax equipment and therefore I show Pentax equipment on this blog.


Hi Photographer friends,

Have you compared  2012 prices of lenses to just a few years ago? Lenses have become more expensive than ever. I believe that the ratio of camera$ / lens$ prices is out of control.

We used to say that the camera bodies were replaceable every-so-often, but that lenses were an investment for life. I don't think that holds true anymore. The sensors are so advanced now, that they often outresolve the lenses, especially the older lenses. So maybe lenses are not a lifetime investment anymore.

In addition, manufacturers are making us believe that, to be a good photographer, we need an arsenal of lenses that we couldn't possibly bring to all of our photo shoots even if we wanted to. Some preach that prime lenses are the only quality lenses one should use, while other recognize that today's zoom lenses are far better than the old school zooms. The reality is that everybody is right, (regarding primes or zooms)  but we don't all have a bank account that allows us to purchase all we want. Most of us have a bank accounts that allows us to  purchase what we need and maybe a little of what we want.

If you want to become a better photographer, all the lenses in the world won't do you much good if you don't learn how to use them efficiently and wisely. An extreme zoom lens or telephoto will bring a far away object in the viewfinder, but the perspective will be all screwed up. It's the same for a wide angle lens, you may catch the scene almost behind you, but the perspective will also be screwed up.

Try to get acquainted with each of your lens, and practice a lot. In most situations, a normal lens (that is a lens that shows you the scene about the same as what your eyes normally see)  will render the best quality images. For an APS-C DSLR, 28 - 30 mm lens is a normal lens, for what we now call "Full Frame", a 45 - 50 mm is a normal lens.

Film/Sensor formatImage dimensionsImage diagonalNormal lens focal length
9.5 mm  8 × 11 mm13.6 mm15 mm
Half-frame24 × 18 mm30 mm30 mm
APS-C16.7 × 25.1 mm30.1 mm28 mm, 30 mm
135- 35mm (Full Frame)24 × 36 mm43.3 mm45 mm, 50 mm
 6 × 4.5 (645)56 × 42 mm71.8 mm75 mm
 6 × 656 × 56 mm79.2 mm80 mm
, 6 × 756 × 68 mm88.1 mm90 mm
 6 × 956 × 84 mm101.0 mm105 mm
 6 × 1256 × 112 mm125.0 mm120 mm
 Large Format 4 × 593 × 118 mm (image area)150.2 mm150 mm
Large 5 × 7  120 × 170 mm (image area)208.0 mm210 mm
Large Format 8 × 10  194 × 245 mm (image area)312.5 mm300 mm

Only after you master photography with a normal lens, should you venture into the Wide Angle, Telephoto and Zoom lenses. Okay...you don't have to, but it would make you a better photographer in the long run.

Even if you currently have an arsenal of lenses, maybe you should spend some time practicing with a normal lens. It's the old adage "One camera, One lens". Most of today's photographers seem to have forgotten the correct usage of each lens. We see photographers stand at the same position and change the angle of view (zoom lenses).  This changes the coverage area without a corresponding change in perspective. Perspective changes not because of the focal length, but due to the position of the lens in relation to the subject. Changing to a normal lens and changing the position of the camera can drastically change the perspective. The "One camera, One lens" teaches you to use your legs (instead of zooming from one position), and puts you,  the camera and the lens in the most appropriate position to obtain the natural perspective. Once you try and practice this, you will get to know each of your lens intimately and will be a better photographer because of it...and who knows what other photographic opportunities will be discovered by walking closer or farther to your subject.

May the light be working with you :)

Thanks for reading,

Yvon Bourque

Sunday, January 8, 2012

Front or Back Focusing Problems? Free test (Lens Alignment) charts for Pentax, Nikon, Canon, Sony, Olympus.

Email: brqyvn@gmail.com


 Hi Photographer friends,


Autofocus Fine Adjustment

Did you experience front or back focusing problems? Hopefully your camera model has a built-in adjustment, otherwise, you may have to send your equipment back to the manufacturer.


 Back and Front Focusing Problems, and how to test your lenses / Cameras.

I personally never had any auto-focusing problem with any lens or camera I ever owned. It seems that these days, members of every blog and forum sites are talking about checking and adjusting the auto-focus on their lenses or DSLR. I think there is a perception that many lenses or DSLR cameras are having front or rear focus problems. In reality, I am inclined to think that inexperienced photographers, “Pixels Peepers”, and inquisitive hobbyists, influenced by the available internet information, are finding problems where there are none. If a particular lens consistently gives out-of-focus results, when all other lenses used with the same DSLR are okay, you might have a focusing problem with that particular lens. If most of the pictures taken with the same DSLR, but with various lenses, are out-of-focus, you might have a DSLR camera-focusing problem.

If you think there is a focusing problem, several "Free" auto-focus testing charts are available from forums, blogsites and websites. I probably downloaded most of them and found inaccuracies with all of them. They are either too small, or too cluttered, or have measurements that are not to scale, etc. Some charts are available for purchase but I find that the prices are way too much. 

Back or front focusing problems are more notorious with subjects that are within a shallow depth of field, such as macro pictures or selective focusing pictures, and with the lens used at its widest aperture. The following three images illustrate this. The middle picture is the way it should be as the cat’s eye was the focusing target. The picture on the left shows a front-focusing problem, and the picture to the right shows a back-focusing problem.


That alone would not mean that the lens or camera has a focusing problem, it could be the photographer’s error. However, similar results time after time could be the first hint that you might have a focusing problem. Perhaps a logical next step would be to test the lens in question under a controlled environment. A controlled environment could be where there is no wind, with the camera set on a tripod, and with good lighting. An auto-focus testing chart could be used, preferably one approved by the manufacturer if they have one available.

Solution

I do not believe that manufacturers have an AF checking chart available to the public. That is the primary reason I took it upon myself to design one. After reading every blog and information about the subject on the internet, after reading comments from the readers of my blog site and threads on various forums, I deducted that one chart could not do it all. Three charts were designed because the minimum focusing distance varies from lens to lens. The smaller chart (Chart–1) works well for close-up lenses and lenses that have macro capabilities. The medium sized chart, (Chart-2) works well for normal lenses, say 30mm to 100mm, which have a minimum focus distance needing a target a little bigger than Chart-1. The third chart (Chart-3) is for lenses that cannot focus very close. One could keep enlarging the last chart, but I believe that the three charts attached herein will be functional for the majority of lenses.


There are various opinions whether a chart should be viewed at 45° from the lens centerline axis, or at 30°, or any angle or even flat. The reality is that it should work at any angle between 1° and 99°, but 45° is the easiest to read. Chart-1 and Chart-2 were design for viewing at 45° from the lens’ centerline axis. The measurements on the viewing surface were corrected for accurate reading when viewed at a 45° angle. The Charts could have been designed for viewing at 30°, giving more viewable depth of field for both front and back. However, I opted for the 45° because the charts could fit on a 8 ½” x 11” standard sheet of paper (Letter size).
I chose a circular focusing area. The bottom half is black and the top half is white. When viewed perpendicularly or flat, it has an oval shape, because the chart is meant to be viewed at 45°. When viewed at 45°, the focusing area appears as a perfect circle. That also helps verifying that the lens is at a 45° angle. "Simple geometry"


Camera Settings

Set the camera to:
* -Autofocus single.
* -Leave the Shake Reduction off if you use a tripod (recommended).
* -Use the Aperture Priority mode.
* -Set the lens aperture to its maximum.
* -Set the AF point to center.
* -Use a remote for the shutter release or use the camera timer to avoid any      movement.

The two smaller charts were designed so that they can be cut and taped together in a way that they can stand at a 45° angle when placed on a table, desk, or flat surface. The camera / lens is then leveled and preferably positioned on a tripod so that the lens’ centerline is aligned with the center of the chart. Place the lens as close as you can to the center of the chart target while it can still focus on the intersection of the black / white section, then back it off just a little. Position the large chart flat (horizontally) and the camera / lens angled at 45° from the chart.


After choosing the chart that will work best with your lens, and once the chart and camera / lens are position correctly, start by trying to focus on the white area of the chart. The lens should not be able to focus correctly and it should be “hunting”. If it achieves focus while pointing to the middle of the white area, it means you could actually be in focus with the lines surrounding the white area and you need to use the next larger chart.

Next, move the camera / lens angle slowly downward until it auto focuses. At that point, you know that you are focused on the intersection of the black / white portion of the chart. That is the center of the chart. The measurements (Metric on the left and English on the right) are at zero on both sides of the chart horizontal centerline. Take the picture and look at the results. The center target line (00) should be perfectly clear while the top and bottom target lines and text should get increasingly and proportionally out of focus. The top target lines represent the back focus area while the bottom target lines represent the front focus area. Repeat this test several times to make sure you have done the test correctly. If the center target line is in focus, but the front and back target lines are not proportionally getting out of focus, there shouldn’t be any serious problems with the lens. Remember that this test is done with the lens opened at the maximum aperture and that the depth of field will increase with smaller aperture. Most of the lenses have a “sweet spot which is usually 1 to 2 stop smaller than the maximum aperture. Therefore, you should only be concerned if the center target line is not in perfect focus while either the back or front lines are.


Understand The Results

Image A: The perfect lens should return a result similar to the image above. 


Image B:  Acceptable Focusing  

Image C:  Back Focusing Problem

Image D:  Front Focusing Problem
A lens with acceptable Auto Focus should have the center target line in focus, even if the back and front focus lines are not equally or proportionally out of focus. Image B
A lens with back focus problems will look like Image C, while a lens with front focus problems will look like the  
Image D


 Word About Auto Focus Sensors

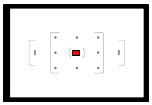
Sensors are either vertical, horizontal or cross type. Most DSLRs now use cross type sensors, check your camera manual. Vertical sensors detect the sharpest horizontal contrast within its area of coverage and lock the focus on that point. Alternatively, the horizontal sensors detect the sharpest vertical contrast within its area of coverage and lock the focus on that point. You guessed it; the cross type sensors detect the highest vertical or horizontal contrast and lock the focus on that point. Since we use the center focus point of our camera, which is usually a cross type sensor, our chart was deliberately designed without any vertical lines in the center so that the focus can only lock at the intersection of the black and white portion of our target. Note that in your viewfinder, you should see an illuminated point showing the focus point. The cross sensor is not necessarily dead center and in perfect alignment with the illuminated focus point. It merely shows you the area of the sensor, but is not an exact focus point and the sensor will only lock on the point of maximum contrast.


Difference Between 45° And 30° Charts

The above charts, one at 45° and one at 30°, illustrates why the depth of field is proportional to the angle of the chart.


These charts will give the same results regardless of of what camera brand you use. However, at the time of design, I was using a Pentax K-5 and the following depicts how to adjust the front/back focus on the K-5.

Refer you your camera user manual for more information on how to adjust your camera specific model.


The
K-5  Custom Setting Number 26

In the Custom Setting menu, navigate with the four-way controller to AF Fine Adjustment, Setting number 26 .
                                                                                                    Use   to turn the AF Adjustment On or Off. When choosing On, press and select if you want to adjust the lens attached or all the lenses . Choosing Apply One  would  correct the current lens attached and would keep the results in memory. Choosing Apply All would apply the corrections to all lenses mounted on the camera. The camera can retain settings for up to 20 different lenses. Using the rear rotary dial, you can adjust the values from minus (-1) to minus (-10) and plus (+1) to plus (+10). You can reset the camera to the factory defaults anytime by navigating down ▼ to Reset and confirm Reset.
Disclaimer

Although the Charts have given me good results, you should fully understand how they help analyzing the Auto Focus accuracy. Read the above paragraphs several times until you completely grasp the procedures. You can adjust the focus of all Pentax lenses, as they are non-permanent changes. You can reset the Auto Focus to factory defaults at any time. As for the other Pentax camera models that do not have the “AF Fine Adjustment”, you should only have a Pentax trained technician adjust the Auto Focus of your lenses or DSLR cameras.

Print the charts on your own printer for the best quality possible. It is best to print on heavy mat paper.

Monday, January 2, 2012

New Year's resolutions

Email: brqyvn@gmail.com

Hi Photographer friends,

Happy New Year to everyone. I haven't posted anything since last year, but I'm back. That was a long week ago.

It's new year's resolutions time;

I think this year, I'm going to get back to taking more pictures. After-all, that's what I really like to do. I'm not going to abandon this blogsite, and I won't stop writing e-books either. What I will stop doing is trying to develop new products like the "Stabilizers" I introduced to the market last year. New equipment is so expensive to develop, having it patented, marketing it and establishing the infrastructure... and so on. I did all the  preceding steps for the Stabilizers, and although I sold hundreds of them, I'm still under by a several thousands of dollars. At least, I tried.

You all know that I am a hardcore Pentaxian, and I will continue using their fine cameras and lenses until I can't hold a camera anymore.  However, this coming year, I will write more e-books and maybe for more than just Pentax cameras. I will venture into the Ricoh cameras, Nikon and Canon brands and maybe Sony.  My e-books have been very successful with Pentax DSLRs users, and I think it's time I publish my e-books "Everything you need to know...and then some" to a broader audience. I will publish my next e-books on this blogsite as well as on Amazon and perhaps through Apple. The format will remain basically the same. The user's manual tell you what the camera can do and my e-books tells you how to do it, in a non-technical way.

Last year, I started my "Keeper or Dud?" series and it's turning out that it takes a lot of time and work to follow up everyday.  If you like the 
"Keeper or Dud?", let me know by using the comment section below this post, or email me. I also post a mirror of this blog on Google+, Twitter and Facebook.

Thank you for reading,

Yvon Bourque

Wednesday, December 21, 2011

The new generation of photographers, iPhone, smart phones and mirror-less cameras.

Cellular phone, Digital camera and video cam, computer, all in one small package.

Email: brqyvn@gmail.com

Hi Photographer friends,

The new photographers

You would have to live under a rock not to know how far photography has evolved in just the last few decades. It’s pretty much a given, when you talk to someone about photography, that you are talking about digital photography. Chances are that if you are under twenty years old, you never used a film camera in your life. That’s not a bad thing, it’s a good thing. 

Technology has evolved so much, that even an iPhone can capture equal or better pictures than most of the currently available digital point-and-shoot cameras. The new iPhone 4S has a Sony 8-Mega Pixel backside-illuminated CMOS sensor and a newly designed f/2.4 lens with an equivalent focal length of 38mm (when compared to a 35mm camera). It can produce good 8” x 10” print and even bigger. However, less and less people care about printed images.

I my  SLRs cameras but I guess technology is about to pass me by if I don't do something soon.

The newer generations of photographers don't make prints, they share their images on the Internet and  email them to each other. There is nothing wrong with that, it's a young people's world after all, and it has always been that way. Did you know that Flickr has more images posted that were taken by iPhone, than any point-and-shoot or DSLRs. It's just so practical. The iPhone (or other smart phones) are with you all of the time. You can take a still image or a good video, and post that on the Internet in minutes.


Big and heavy DSLR, my favorite type of camera, in Pentax, Nikon and Canon.

The size is obviously an advantage. Speaking of sizes, DSLRs have to be somewhat bulky because of the prism and mirror.  Sony has recently announced the NEX-7, a compact digital camera with interchangeable lenses, 24 MP sensor, great Electronic View Finder, tilting LCD screen, and top-notch image quality.

Sony new NEX-7
I love my DSLRs, but soon, I too will probably get a mirror-less camera because it just makes sense and it's so portable. Companies have tried for several years to introduce a good mirror-less camera, but the Sony is the first that makes a lot of sense. It has an APS-C sensor with 24 MP. Now that's the wave of the near future.

I will always keep my DSLRs, as I also kept many of my 35mm SLRs, now gathering dust... but I like to look at them. They will soon have new companions...the DSLRs.

You either go with the flow or you are left behind. The day I stop going with the flow, is the day I will start pushing daisies.

Thanks for reading,

Yvon Bourque

Friday, November 25, 2011

Our first outing with my new Travel Trailer / Photo Studio

Email: brqyvn@gmail.com

 Hi Photographer friends,

A few weekends ago, we took my Travel Trailer for our first outing. I purchased this Trailer several months ago and wanted to rebuild it to it's original condition...and then some.  I'm almost completed. I converted the inside so that it could also serve as a field photographic studio. I have the same computer equipment and printing capabilities in it as I have at home. We have Internet by using the Verizon cellular service. WE have our own electricity when we need it via a Honda quiet generator and also a 1200 watts inverter hooked up to the Chevy Silverado.

We chose a very desolated place for our first trip. It's called Mojave River Fork campground. It's part of the Mojave High Desert, and if one needs some quiet time, that's the place. All we could hear was the wind and the birds.

I worked on testing my new AlettA Stabilizers Generation II and had fun doing it. There weren't anybody around. My spouse was a little reluctant to join me at first, but she ended up coming, and she enjoyed the quietness a lot.

Unlike a regular trek, I was able to bring all of my photographic equipment. That is all of my Pentax lenses and four cameras, The K-r, the K-7, the K-5 and the new Pentax Q. Here, in Southern California, we can camp all year round. It gets a little cold at night but the trailer has a good heater. It's really a home away from home. The best part, is that I purchased it for about the same price as a Pentax K-5 with a good lens attached. I added lot's of work and about $1,000 in repairs and upgrades.


We had the choice of space as we were alone.

It was a beautiful day, with a moderate temperature of about 70 degrees F.

It took all but five minutes for Anne to get a long chair and soak up the sun.

I'm not a birder, but they were all around and unafraid.

A lone tree, among the rocks and tumble weed.

Our tax dollar at work...a fire hydrant in the middle of nowhere.

This is a close up of a dead tree trunk. I liked the pattern.

Testing the K-r with the DA* 300 mm set on the Stabilizer G-II, QR system and L-bracket.

Here, we have the K-5 with the DA*300 mm on the G-II. Perfect horizon on not so perfect surface.

Testing the K-r with the DA 18-55 mm set vertically on the Stabilizer G-II, QR system and L-bracket.

Thank you for stopping by,

Yvon Bourque
alettaphoto.com


Saturday, November 19, 2011

The AlettA Stabilizer Generation-II, for Pentax, Canon, Nikon, Sony, and Olympus is now shipping. Starting at $79.95. Get yours today.

Email:  brqyvn@gmail.com


Hi Photographer friends,

I've been involved with photography for decades. It's my passion and I know it's yours too.

Are you using a Pentax, Canon, Nikon, Olympus, or Sony DSLR?
Cameras have come a long way and today's Digital Cameras are producing image quality beyond what we ever thought possible. However, one thing that hasn't changed for ages is how, we as photographers, compose our images. The composition rules of the last Century still apply today. One of these rules suggests that you use a tripod to keep your camera from shaking.


Think about it!  Any photographer will tell you that using a tripod  is still the best best way to produce sharp images. That is especially true with telephoto lenses. Even with an "in-camera" Shake Reduction System, it is always better to use a tripod. Unlike cameras, tripods haven't changed all that much. They are still composed of three extensible legs and a camera mount. They are still a "pain-in-the-neck" to carry around. You often don't have one with you when you need one, and when you bring one with you, you often can't use it for one reason or another. I own several tripods and I have used them for years, but It's almost 2012 and it's time to bring the tripod stabilization to a new level.


The DSLR/G-II StabilizerI up side down
 to show how it fits in your camera bag, 
while still attached.
The common tripod has finally evolved. We have designed a device that stabilizes your camera wherever and whenever you shoot. It can stay attached to your camera at all times and still fit in your camera bag. When your camera is attached to a tripod, the distance between the camera and the points of contact can be as much as five feet. It's no wonder that tripods are not always stable in windy situations. Our device points of contact are not even two inches away. With our  accessories, you can go from portrait (vertical) picture taking to landscape (horizontal) picture taking, in a flash.  Arca-Swiss and other Quick Release (QR) systems are supported.


Our device, the "AlettA Stabilizer Generation II" is what you need.


You're wondering about Generation I, aren't you? Well...we sold a multitude of Generation I Stabilizers and asked our clients for feedback and suggestions. We got some good feedback and we have incorporated  many of the suggestions. We think our Stabilizers are what you need. Simplicity and functionality is what we  were aiming for and we believe we've succeeded. All the improvements are compatible with Generation I and current owners of our Generation I Stabilizers can purchase the upgrades at a discount.


A basic tripod  costs around $150.00.  A good tripod system will cost on the upper side of $400.00 and more. We wanted to produce an expandable system, using the highest quality materials, while keeping a low retail price. We use aircraft grade aluminum and our parts are machined on  CNC equipment, and powder coated for durability. Our prices are more than competitive... We really believe this is the best investment for your hard-earned money.


Here's why our Stabilizers will improve your photography and why you need one.


We are photographers and we know that a picture is worth a thousand words.  Here's more pictures and fewer words...the language we all know.  So,


This is the top view of the Basic Stabilizer G-II. Note the three slots, they allow mounting of any Digital cameras, from Pentax, Canon, Nikon, Olympus, Sony and others.  The green material is called "egrips" and it keeps the camera from sliding out of position. The bubble level helps in leveling the camera.
This is the bottom view of the Basic Stabilizer G-II. A stainless steel mounting screw with a D-ring is included to minimize efforts in tightening the camera to the Stabilizer. Note the rubber leveling leg extremities? They keep the camera from slipping.
Three sets of legs are supplied with the Basic Stabilizer G-II; 1/2" long,  1" long and 1 1/2" long.


This is the Real World use of the Basic Stabilizer G-II. Notice how the camera can be set on irregular surfaces.

This is the Stabilizer G-II with the Extended legs assemblies. It gives an even bigger footprint and the legs are adjustable in all three axis. The center of gravity can be adjusted for the lens being used or the surface on which the system is set up.
This is the underside of the Stabilizer G-II with the extended legs assemblies. The assemblies are mounted underneath the G-II and can swivel about 200 degrees horizontally.
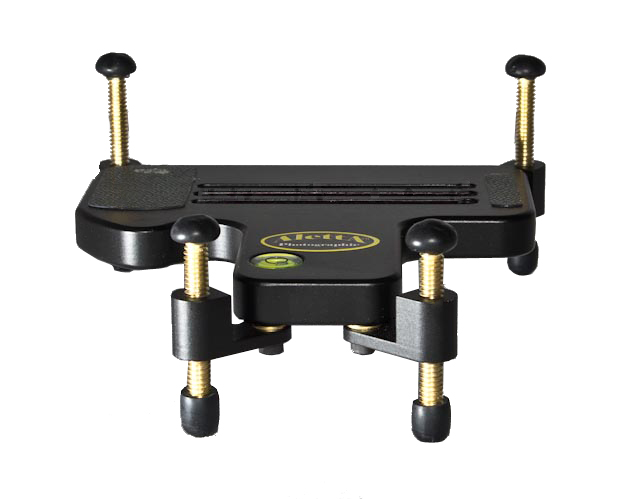
The G-II Stabilizer front view, equipped with 2 1/2" long legs in the back and 2" long legs in the front. (Standard supply). The legs' height can be adjusted from the top side of the G-II, making it even simpler than the previous Generation. Longer legs, including the rubberized ends, can be purchased separately. We can make them as long as you want.


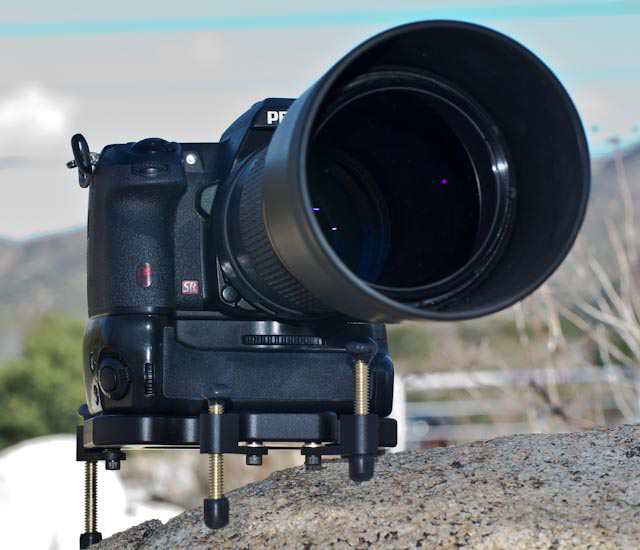
Another Real Life example of using the G-II with a DSLR, including the battery grip, and a 300 mm lens on an uneven surface...stable as a rock.

 We also have an L-bracket for when you want to take vertical (Portrait mode) pictures as well. 
Along with the Basic Stabilizer G-II, this is an economic way to stabilize your camera in Portrait (Vertical) or Landscape (Horizontal) mode.
Shown here with a medium size DSLR. The only hassle with this arrangement is that it takes some time to go from Portrait to Landscape.


This is the same L-Bracket outfitted with an Arca-Swiss compatible Base Plate and two Quick Release (QR) plates. This makes changing from Portrait to Landscape straightforward and quick. You can use your own Base Plate and QRs , and not necessarily Arca-Swiss compatible.
The Arca-Swiss compatible is consist of of one base plate, two QR plates + attachment screws, and one 3/8" to 1/4" adapter bushing.
Shown here is the complete system. It includes the Stabilizer G-II with the Extended legs assemblies, the L-Bracket and the Arca-Swiss compatible Base Plate and QRs.
One minute, you are in Landscape mode...
and the next minute you are in Portrait mode.

Real World use of a complete system.


When I first started designing the Stabilizer, my goal was  to keep my camera from tipping over when a telephoto was attached. Once I got started, I realized that I could do a lot more with such system.


Other than standing on water, The G-II system can be used on essentially all hard surfaces. It won't replace a tripod for studio work, but because it's lighter and stays attached to your camera, you can use the G-II in 95% of the situations when stabilization is needed.


It's great for trekking. It only adds about 12 ounces to your camera and it takes no time to set-up. There are always some surfaces that can be used for stability, a rock, a tree trunk, a fence, or even the ground. Once you use a Stabilizer G-II, you will realize how practical it is. Simplicity and functionality is what we were aiming for and we've achieved it.


It really doesn't come easier than that.

The Extended legs assemblies, a set of four, are available separately so you can start with the Basic Stabilizer G-II and grow to a full system. Who knows what we will come up with for additional accessories!

PRICES:
  • AlettA - G-II Basic Stabilizer: $79.95
  • AlettA- G-II Stabilizer with extended legs assemblies: $129.95
  • AlettA - L-Bracket: $39.95
  • AlettA - Arca-Swiss compatible Base plate and QR plates: $99.95
  • AlettA - Set of four extended legs assemblies: $49.95
  • AlettA - G-II Basic and L-Bracket: $109.95 (You save $10.00 from purchasing separately)
  • AlettA - G-II with extended legs, and the L-Bracket: $149.95 (You save $20.00 from purchasing separately)
  • AlettA - G-II with extended legs, and the L-Bracket,and the Arca-Swiss compatible setup:  $229.95 (You save $40.00 from purchasing separately) * Best deal.
To make a purchase, log on to our e-commerce store:  
alettaphoto.com


or email us at brqyvn@gmail.com  Subject:Stabilizers


The AlettA Stabilizers fit Nikon, Pentax, Canon, Olympus, Sony and all other makes.


The AlettA Stabilizer G-II is 5-1/2"  wide (side to side) x 5" deep (back to front) x 1/2" thick. The extended legs add another 1" each in the horizontal plane and the maximum elevation change is about 2" front to back and side to side.