
Hi Pentaxian friends,
Photoshop Elements might seem like a poorman's version of Photoshop CS3, but nothing could be farther from the truth. Photoshop CS3 or the newer CS4 is a professional graphic software package designed for, well...graphic designers. Magazines are full of examples of Photoshop manipulations, from covers to most advertisements.
Photoshop Elements has everything you, as a photographer, will likely ever need. It is the perfect companion of Photoshop Lightroom and these two Photoshop modules are what I use for all my photographic images manipulations. I like Lightroom for cataloging files and also to manipulate the RAW files. Raw files can be handled in Elements as well, but Lightroom is a bit better at it. It's probably a matter of opinion.
Photoshop has recently introduced Elements Version 7. If you already have version 6, it might not be worth upgrading although there are some pretty neat new features. Suffice to say that I have the new version 7 and in the course of the next few weeks, I will show what can be easily done with Elements 7 to improve your images, or even change them completely.
Today, I am introducing the new "Smart Brush" tool. It's not a totally new tool, as all the effects and enhancements that can be obtained with the "Smart Brush" are available in previous versions of Elements. What's new is that "Smart Brush" combines several different tools in previous versions and makes enhancements in a quicker and smarter way, hence "Smart Brush".
Let's demonstrate with an example. I picked the first image in a series of pictures taken in Palm Springs. The transformations are a little exaggerated and bold, but that will help getting the point across. I can't imagine anyone making such bold changes, but small changes can certainly enhance your images, all effortlessly.
 From this image above to the image below.
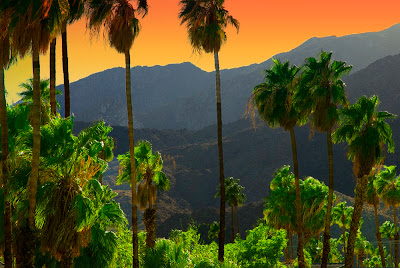
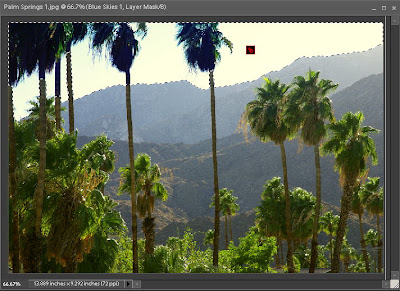
Click on the Smart Brush button located on the left side of the screen. Then click in the area you want to enhance. The area is surrounded with bounding lines. In this case, we chose the sky and we will change it to as a sunset look.

 Next, use the top menu and pull down the sub-menu, chosing sunset. Voila, the sky turns to a sunset. You can adjust the colors by double clicking on the little square icon in the middle of the revised area.
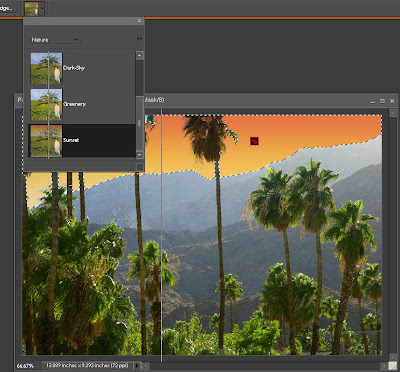
In this case, I then highlighted the mountains and chose lighting then darken from the pull-down sub-menu.


I did the same process with the palm trees, using the green color enhancement. There are no limits to what you can change, but too much, like in this case, looks fake.
And that is my final image.

Here is a video of Elements' new features, and here is a video for the "Smart Brush" feature. It goes in much more details.
Thank you for reading,
Yvon Bourque
2 comments:
Am I the only one who finds that Silkypix does a better job of the RAW conversion at least? I find that it picks out more detail than ACR or dcraw (in Linux) does. SP gives a different set of sharpening tools for RAW images. Perhaps this has something to do with it.
Hello!
Hope you had a great weekend!
Thank-you for posting techniques from Elements; they really help someone new to the digital age.
I wish you and your family a terrific week.
Sincerely,
Jeff
Post a Comment