
Email: brqyvn@gmail.com
Hi Photographer friends,
 The K-3 even allows three user
settings, that once set, you can return to the same setting by simply rotating
the mode dial. A few examples of that would be setting the camera for a studio
where the light is constant. In saving the settings in U1 for example and
renaming it “Studio”, you can bring the setup instantly when in your studio.
Sometimes, you like to shoot in Black & White. Set the camera to B&W
and other parameters you want, save it to U2 and rename it “Monochrome”. When
you want to shoot Black & White, move the rotary Mode dial to U2.
The K-3 even allows three user
settings, that once set, you can return to the same setting by simply rotating
the mode dial. A few examples of that would be setting the camera for a studio
where the light is constant. In saving the settings in U1 for example and
renaming it “Studio”, you can bring the setup instantly when in your studio.
Sometimes, you like to shoot in Black & White. Set the camera to B&W
and other parameters you want, save it to U2 and rename it “Monochrome”. When
you want to shoot Black & White, move the rotary Mode dial to U2.
Press here to go to our e-book pages.
Hi Photographer friends,
There are hundreds of way to use
and customize your Pentax K-3.
The K-3 even allows three user
settings, that once set, you can return to the same setting by simply rotating
the mode dial. A few examples of that would be setting the camera for a studio
where the light is constant. In saving the settings in U1 for example and
renaming it “Studio”, you can bring the setup instantly when in your studio.
Sometimes, you like to shoot in Black & White. Set the camera to B&W
and other parameters you want, save it to U2 and rename it “Monochrome”. When
you want to shoot Black & White, move the rotary Mode dial to U2.
Now, I am always asked which mode
I prefer. It’s really a matter of choice but I do have a preferred mode. It is
the (P) mode. The reason I like this mode is that it replicates all other modes
in one place.
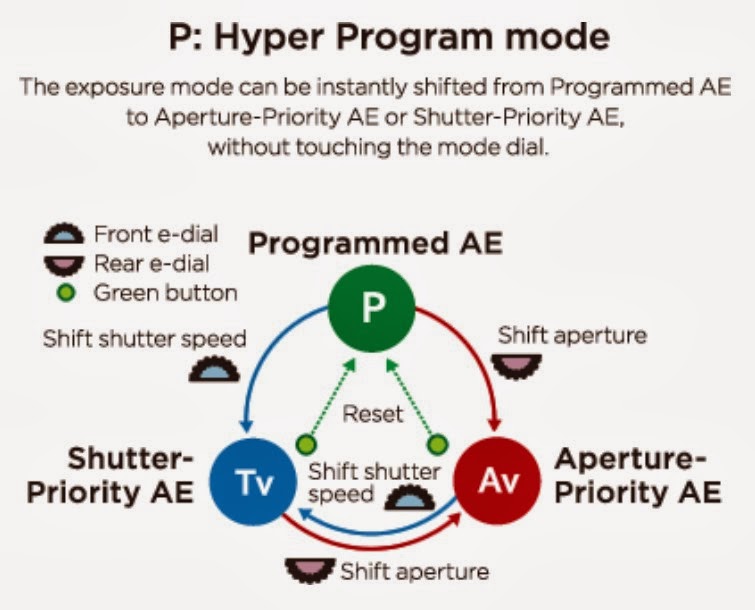
In (P) mode, turning the rear
e-dial changes the aperture. Turning the front e-dial changes the shutter
speed. If you set the aperture, the camera adjusts the shutter speed
accordingly. If you set the shutter speed, the camera adjusts the aperture
accordingly. You can change the ISO at any given time through the ISO button
and the rear e-dial. (Note that the ISO has to be reset manually), as the (P)
mode only lets you have control of the aperture and shutter speed. It
essentially replaces the (Av) and (Sv) modes. Quickly adjust the ISO and it
emulates the (TAv) mode.
You can preset some of the
attributes such as filters, file type, resolutions, etc, and save that to U1 or
U2, or U3. Rename it to something you can remember and understands such as (P
mode with presets) or whatever.
When in (P) mode, the green
button still works as usual except for the ISO. The ISO is really something that
you should set before you take any photographs. Assess the lighting and put the
ISO at the lowest setting possible as it will give you the clearest images. If
the lighting is bad or you are shooting fast moving objects, set the ISO higher,
but not more than you need as the image will become increasingly grainy as the
ISO goes up.
It’s digital, so you can take many
test shots to find what is the best settings for the scene you are about to
photograph.
A useful tool is the [+/-] button.
You can use it anytime and change the under or over exposure if your image
comes out too dark or too bright.
To make sure that one good image
comes out each time I press the shutter release, I always use the Continuous
shooting and at around 8 frames per second, you know one will likely be a
keeper. That works especially well with portraits and when a fast shutter speed
is required such as sport photography. It’s not like film, once you purchase a
memory card, the images are free.
Finally, I always post-process my
images through Adobe Lightroom so that the final image represents exactly what
I had envisioned. Like Ansel Adams said; you don’t take a photograph, you make
a photograph.
I’m sure we all have our favorite
settings, but now you know mine.
Thanks for reading,
Yvon Bourque
P.S. We carry e-books for all Pentax DSLRs. Our e-books are chuck full of information, images, how to, tips, details about each specific Pentax DSLR, all written is a not-so-technical way. Email us and we will send you a sample of the e-book for your Pentax DLR. brqyvn@gmail.comPress here to go to our e-book pages.
No comments:
Post a Comment