
Exposure Bracket Mode
One undeniable way to get properly exposed pictures is to bracket the exposure. Bracketing is described as taking several shots of the same subject with variable exposure settings ranging from underexposed to overexposed frames. The term “frames” comes from the film camera era and can be replaced with the word “files” in the digital world we now live in. You can take three or more shots of the same subject, within just a little over a one second period and with a different exposure setting for each shot. This increases the probability of getting a properly exposed picture significantly.
In all likelihood, the K10D is capable of taking a correctly exposed shot the first time with Autofocus lenses, as both the camera and the Autofocus lens used, exchange data during the exposure. But what about the older manual lenses? The K mount manual lenses as well as the M42 screw mount lenses will all work with the K10D to some degree. Of course, the focus will be done manually, although the camera does confirm focus in the viewfinder and with an audible beep. The tedious task becomes setting the proper exposure when using a manual lens. I can’t think of a better way to achieve perfect results with less than 100% compatible lenses, than using the exposure bracketing method. Pentax has approximately twenty five million lenses out there in the world, which can be mounted on the K10D directly or with the use of an inexpensive adapter. For instance look on EBay; they usually have hundreds of manual lenses that can be purchased on any budget. What a great way to increase your lens collection and satisfy your LBA. Most of these older lenses have something in common that is rarely seen in today’s modern lenses. They were mostly all assembled by hand and were typically made out of metal. The maximum apertures were also larger than the lenses sold today. It is said that if today’s lenses were made with the same quality standards and fast apertures as the older lenses, they would cost thousands. So, whether you have been wondering about the usefulness of older lenses or not, they can all be used. Excellent results can be achieved thanks to the Auto Bracketing mode built in the K10D.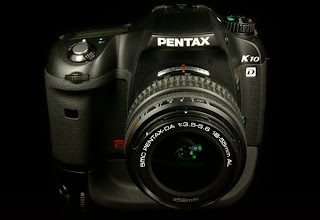 The bonus is that, unlike film, once you have a good memory card, there are no additional costs to take multiple exposures, and you can see the results immediately. You can delete the unwanted shots. Digital is good. To set the Auto Exposure Bracket on the K10D, press the Exposure Bracket button (Located to the left of the viewfinder…no menus to surf through. This is a dedicated button.) and while holding it pressed, use the front e-dial to set the auto bracketing to either on or off and with 3 shots or 5 shots. You can also set the amount of bracketing you want to use between each shot in increments of 1/2EV or 1/3EV. Just in case you don’t recall, here is how to set the EV steps. Press the Menu button. Using the four-way controller, navigate right to the Custom Setting Menu, then down to EV Steps. Move to the right and choose 1/2EV or 1/3EV steps. Press the OK button twice. What’s more, you can select the order in which the bracketing works. It can be set so that the first shot is underexposed, the middle shot is exposed per the camera metering system, and the last shot overexposed. Any combination can be set. To change the bracketing order, press the Menu button. Using the four-way controller, navigate right to the Custom Setting menu. Using the front e-dial, go to page 2/6. Navigate down to Auto Bracketing order, then right and then to your preferred sequencing. 0 means no compensation, + means overexposure and – underexposure. Press the OK button twice.
One undeniable way to get properly exposed pictures is to bracket the exposure. Bracketing is described as taking several shots of the same subject with variable exposure settings ranging from underexposed to overexposed frames. The term “frames” comes from the film camera era and can be replaced with the word “files” in the digital world we now live in. You can take three or more shots of the same subject, within just a little over a one second period and with a different exposure setting for each shot. This increases the probability of getting a properly exposed picture significantly.
In all likelihood, the K10D is capable of taking a correctly exposed shot the first time with Autofocus lenses, as both the camera and the Autofocus lens used, exchange data during the exposure. But what about the older manual lenses? The K mount manual lenses as well as the M42 screw mount lenses will all work with the K10D to some degree. Of course, the focus will be done manually, although the camera does confirm focus in the viewfinder and with an audible beep. The tedious task becomes setting the proper exposure when using a manual lens. I can’t think of a better way to achieve perfect results with less than 100% compatible lenses, than using the exposure bracketing method. Pentax has approximately twenty five million lenses out there in the world, which can be mounted on the K10D directly or with the use of an inexpensive adapter. For instance look on EBay; they usually have hundreds of manual lenses that can be purchased on any budget. What a great way to increase your lens collection and satisfy your LBA. Most of these older lenses have something in common that is rarely seen in today’s modern lenses. They were mostly all assembled by hand and were typically made out of metal. The maximum apertures were also larger than the lenses sold today. It is said that if today’s lenses were made with the same quality standards and fast apertures as the older lenses, they would cost thousands. So, whether you have been wondering about the usefulness of older lenses or not, they can all be used. Excellent results can be achieved thanks to the Auto Bracketing mode built in the K10D.
The bonus is that, unlike film, once you have a good memory card, there are no additional costs to take multiple exposures, and you can see the results immediately. You can delete the unwanted shots. Digital is good. To set the Auto Exposure Bracket on the K10D, press the Exposure Bracket button (Located to the left of the viewfinder…no menus to surf through. This is a dedicated button.) and while holding it pressed, use the front e-dial to set the auto bracketing to either on or off and with 3 shots or 5 shots. You can also set the amount of bracketing you want to use between each shot in increments of 1/2EV or 1/3EV. Just in case you don’t recall, here is how to set the EV steps. Press the Menu button. Using the four-way controller, navigate right to the Custom Setting Menu, then down to EV Steps. Move to the right and choose 1/2EV or 1/3EV steps. Press the OK button twice. What’s more, you can select the order in which the bracketing works. It can be set so that the first shot is underexposed, the middle shot is exposed per the camera metering system, and the last shot overexposed. Any combination can be set. To change the bracketing order, press the Menu button. Using the four-way controller, navigate right to the Custom Setting menu. Using the front e-dial, go to page 2/6. Navigate down to Auto Bracketing order, then right and then to your preferred sequencing. 0 means no compensation, + means overexposure and – underexposure. Press the OK button twice. 
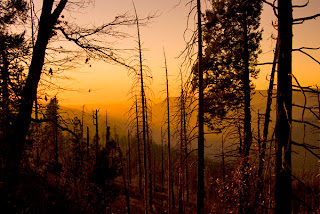
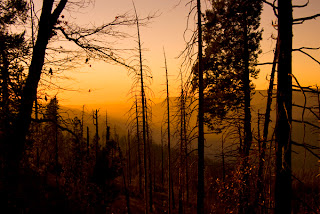
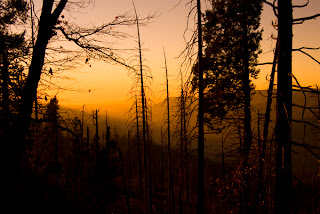
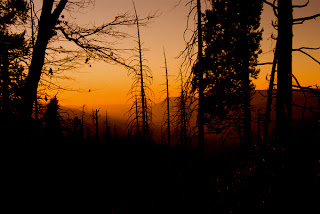
The example above shows an auto bracketed image with five shots taken in incremental steps of 1/3EV and organized with the most overexposed image first, toward the most underexposed last. The series was taken in JEPG format with five separate exposures. The shutter release button was fully depressed and stopped automatically after the five shots were taken. It took just over 1 ½ sec to shoot the entire set. The same sequence could have been shot in RAW format and post-processed with greater correction latitude.
Now…just think of how this would be useful in HDR (High Dynamic Range) photography!
We will talk about HDR photography in an upcoming post.
Thank you for reading,
Yvon Bourque
No comments:
Post a Comment