
Hi Pentaxian friends.
Maybe I should have more of an entrepreneurial mind and turn everything I touch into profit.
Case in point; Last year, I designed a focus check system, still free for the download on this site, to check front and back focusing problems reported by many. It was downloaded thousands of times and I received a proportional amount of thank you notes for making it available. There were other charts available at the time, with a different approach to the same problem (perceived or real),
It seems that someone found a way to mimic my charts and added an alignment plastic device to make sure you could get your camera aligned with the chart, kind of idiot proofing the process. It's a neat gadget, but if you can't perform the simple task of aligning your camera with a chart, maybe you have no business messing around with precise DSLR cameras and lenses costing thousands of dollars and equally complicated. Actually, alignment is not paramount to the results obtained. What is, is the point where your camera center auto focus sensor locks on.
 Nonetheless, I applaud the business savvy of the person that introduced his rendition to the market for $139.00.
There is some kind of paranoia amongst some photographers about their camera or lenses not properly focusing and thus rendering "less than ideal" results. Although it does happen once in a while, DSLRs and lenses are generally adequately adjusted at the factory. The first signs of back or front focusing should be easily detected by repeated blurriness where you, the photographer, thought the illuminated focus point in the viewfinder was right on your intended subject. It is more apparent at close range and with a large aperture, as the depth of field is narrower in these conditions. I doubt that anyone has ever had any problems with back or front focusing while shooting a subject at ten feet away or more and at an aperture of f/8 or smaller. Note that back /front focus problems are easier to adjust with prime lenses. It is very hard, if not impossible, to adjust the back/front focus accuracy of a zoom lens, at both the wide and narrow end. I suppose that you could adjust a zoom lens at one end for particular shots and set it back to average when completed.
You can still download my focus check system (3 charts) for free and save yourself $139.00 for some more glass. However, read the following paragraphs carefully and use these instructions with the larger chart of my system.
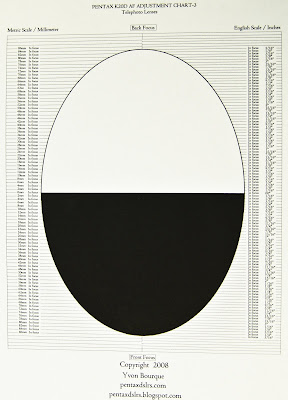 Chart viewed at right angle. Notice the target area in oval shaped.
 Viewed at an angle of 45 degree, the target looks perfectly round.
That larger chart is good for any lenses but just more cumbersome. You can't go wrong and you will be able to determine if indeed you have front or back focusing problems. If you own a Pentax K20D, or a Canon 1DMkIII, 1DsMkIII, 5DII, 50D or a Nikon D3, D3x, D300, D700 or a Sony A900, you can adjust your lenses "in-camera", assuming that the lens is at fault.
Place the chart on a flat surface.
Install the lens to be tested on your camera and use a tripod to secure the camera from any shake.
Leave the Shake Reduction off if your camera is so equipped.
Use a remote or the timer on your camera so that you don't touch the camera while testing.
Set the Autofocus to single.
Set the Aperture Priority mode (Av).
Set the AF point to center.
Set the lens aperture to its maximum.
Set the camera on a tripod, at about 45 degree from the chart. (You don't have to be exactly at 45 degree, whatever angle you use will allow you to see the same depth behind or in front of the focus point). Get as close as you can from the chart while still being able to get the camera to autofocus on the chart.

Align the camera to the chart by making sure the intersection of the black/white line is seemingly horizontal in the viewfinder.
Try to autofocus in the white area inside the target. The lens should not be able to autofocus correctly and it should be “hunting”. If it achieves focus while pointing to the middle of the white area, it means you could actually be in focus with the lines surrounding the white area and you need to get closer or you need a yet bigger chart. (Any office store will be able to enlarge the chart).
Next, move the camera / lens angle slowly downward until it autofocuses. When it does, you know that you are focused on the intersection of the black / white portion of the chart. Take the picture and look at the results.
The center target line (00) should be perfectly clear while the top and bottom target lines and text should get increasingly and proportionally out of focus. The top target lines represent the back focus area while the bottom target lines represent the front focus area. Repeat this test a few times to make sure you have a problem. If the center target line is in focus, and the front and back target lines are proportionally getting out of focus, there shouldn't be any serious problems with the lens. Remember that this test is done with the lens opened at the maximum aperture and that the depth of field will increase with smaller aperture. Most of the lenses have a “sweet spot which is usually 1 to 2 stop smaller than the maximum aperture. Therefore, you should only be concerned if the center target line is not in perfect focus while either the back or front lines are.
A WORD ABOUT AUTO FOCUS SENSORS
Sensors are either vertical, horizontal or cross type. Pentax K10D and K20D have 9 cross type sensors and two vertical sensors. Vertical sensors detect the sharpest horizontal contrast within its area of coverage and lock the focus on that point. Alternatively, the horizontal sensors detect the sharpest vertical contrast within its area of coverage and lock the focus on that point. You guessed it; the cross type sensors detect the highest vertical or horizontal contrast and lock the focus on that point. Since we use the center focus point of our camera, which is a cross type sensor (that's true with most if not all brands of cameras), our chart was deliberately designed without any vertical lines in the center so that the focus could only lock at the intersection of the black and white portion of our target. Note that in your viewfinder, the little red square indicates the focus area but the cross sensor is not necessarily dead center. The red square merely indicates the area of the sensor, but is not an exact focus point and the sensor will lock on the point of maximum contrast, and that might be anywhere in the red square. With our chart, we know it will lock on the black/white intersection, and even if it's not exactly in the middle, it won't matter.
You take the picture and enlarge it on the LCD screen and check if you have back or front focusing problems. You actually don't want any graphics, bulls eyes, etc, in the way otherwise you can't tell for sure what the focus is locked on.
ANALYZING THE RESULTS
Front Focus Problem - Not acceptable


Slight back focusing problem - Acceptable
I suggest that you check the autofocus with various lighting conditions as there are reports that tungsten lighting makes the lenses front focusing. My tests were consistent with all lighting conditions. I don't have $139.00 to test the plastic gadget, but it would be interesting to see if the results are different. My guess, they should both give the same results, one for free and one for $139.00. But I have to admit, the plastic gadget is really cute!
Thank you for reading,
Yvon Bourque
3 comments:
I'm with you, I like free.
Amen brotha. And thnx for breaking it down for the ubernoobers. Keep up the good work.
Adam
You do it for free because for the love of photography and of your desire to share.
For those of us that know of this, we thank you from the bottom of our hearts. Do not be dishearten.
Post a Comment